EXPAND THE LIMITS OF YOUR HOME Planning Home Adaptations that Make Your Existing Space Work for You
BY MICHELE ROSNER
Our family loves our home. It's a modest ranch house, right in the heart of a small town in the Midwest and just blocks from where I went to high school. My husband Matt and I have lived in this home since we were married, and our four children have spent their childhoods here. Just weeks ago, our oldest son graduated from that same high school I did. We have planted deep roots in this community and this home.
As our family has grown, the demands we have put on our living space have also grown. We have continued to adapt our home to meet our family's changing needs, adding bedrooms as we added kids and updating our kitchen as appetites grew. But the greatest demands on the space have come from our 16-year-old daughter Julia, who has multiple disabilities and complex medical challenges.
Our house was not built with accessibility in mind— the hallways are narrow and the bathrooms are small. As Julia has grown, her care needs have become more involved and complicated. She relies on caregivers for one hundred percent assistance with her daily care needs, and she is no longer a small child who can easily be carried throughout our home.
Whether it is because of financial constraints, emotional attachment, personal choice or lack of accessible homes on the market, many families who have children with special needs find themselves wanting to make adaptations to their existing home rather than moving or building a new home.
Through trial and error, we have developed a structured, yet creative thought process that has helped us maximize our available space to accommodate Julia's needs. Here is the process we have found to be effective:
1. Determine the greatest challenge(s): Many people's budget and sanity are more suited to a series of smaller projects implemented over time, rather than a single all-encompassing remodel. This also allows you to focus on the challenges that are currently, or will soon be, creating the biggest complications and the most frustration.
Our first big challenge as Julia grew was bathing, changing and dressing her. We were manually lifting her in and out of a bath chair, and she was becoming too heavy for that to be safe. While the fold-down changing table in our bathroom that Matt designed and installed worked wonderfully when Julia was smaller, her body had grown longer than the table.
2. Define needs and wants for the home adaptation: Create your list of priorities: those things that you must have because they are critical to mobility or accessibility; or they impact safety. Also include your wants: things that would make your life easier, but you could live without. Think about what your needs are now, and as much as possible, also try to project future needs.
In many cases, the space being "Many families who have children with special needs find themselves wanting to make adaptations to their existing home rather than moving or building a new home." modified will also be used by other family members and/or guests. It is important to consider their current and future needs as well.
The more clearly you can articulate what is not working as well as what you need and want for better accessibility, the easier it will be to see whether or not proposed adaptations will be able to deliver the results you are trying to achieve.
To resolve the challenges with bathing and changing Julia, as well as providing bathroom facilities for the rest of the family and guests, our list of needs and wants looked like this:
NEEDS
• Ability to give Julia a bath: Julia loves soaking in the bathtub, and we wanted to make sure we did not take away that pleasure. In addition, sprays of water can startle her and trigger a seizure, so a roll-in shower would not work for her. Based on those factors, our main priority was finding a way to get her in and out of a bathtub safely.
• Showering for other family members: Since this bathroom also serves as the primary bathroom for Julia's three siblings, it had to have a shower. • A safe, convenient area for changing and dressing Julia: We needed to have a changing table that was at the right height for caregivers as well as the right length to accommodate our growing girl.
WANTS
WANTS • Temperature control: Julia struggles with managing her body temperature, so we wanted to make sure we had the ability to keep her warm during bathing and changing.
• Storage: We wanted at least as much storage space as the current space, but with easier access.
3. Explore alternatives and choose the best option: Now is the time to be creative. Make a list of every possible idea that might be able to meet your needs and wants. As you are brainstorming, try not to let your ideas be limited by how you are doing things now. Write down every idea! Do not rule out options that seem completely impossible, too expensive or over-the-top outrageous. Those 'crazy' ideas might become the foundation of an amazing out-of-the-box solution.
Bring in others who can help with idea generation and evaluation. Talk with friends and professionals with construction and remodeling experience, such as architects, builders, engineers, electricians and plumbers. Members of your child's medical and therapy team might be able to provide suggestions. Consult with companies that specialize in accessibility and mobility for people with disabilities. Keep in mind that the more conversations you have, the more ideas you will generate, increasing the likelihood of a lightbulb moment. Talk with parents with kids who have similar needs to yours. Request pictures of their care spaces and run downs on how well the space works for their family. There are also online options for researching home adaptation ideas on Pinterest and Facebook.
The "Home Hospital NOT Hospital Home" Facebook group has been a valued resource for our family.
After you have developed a list of possible options, think through if and how the adaptations will be able to accommodate your needs and wants. Take the time to review every step of the activities that will happen in the space and every aspect of the space usage. This is the best time to spot potential challenges, giving you the chance to resolve them before construction begins and adaptative equipment is purchased. To meet Julia's bathing and changing needs, here are some of the options we considered and how we determined which would best meet our needs:
1. Convert existing laundry room and bedroom into an adapted bathroom: convert garage space into a new bedroom for Julia: With our laundry room, a small bedroom and the garage adjacent to one another, we knew this was an area where we could do a home adaptation and expansion. The biggest appeal was the ability to design a fully adaptive bedroom and bathroom from scratch, and we let our imaginations run loose. We talked about building a bathtub that was raised up on a platform, putting Julia at counter height for bathing – a dream for the caregiver giving her a bath. Taking it a step further, we talked about raising the ceiling above the bathtub to create headspace for a tub/shower combo, making it more usable for others in our family.
However, this option was not the best choice for us. We would lose valuable garage space, and it would be an extensive, costly project. In addition, the raised bathtub was a highly specialized modification that could negatively impact our home's resale value.
2. Use a bath chair lift and transfer to bedroom: This was the option provided by the accessibility consultant. She suggested using a bath chair lift to raise Julia up about 18" above the tub bottom, and then manually transferring Julia to her wheelchair and moving her to her bedroom to use her bed for dressing. This suggestion did not meet our top priority of eliminating the difficult and dangerous manual lift out of the tub.
It also added additional manual transfers to the process and required moving a chilled, wet child to another room. Our lesson learned here was to make sure that we evaluated every option thoroughly ourselves. Having clearly defined priorities ensured that we did not end up with an adaptation that did not meet our specific needs.
3. Adapt existing guest bathroom Raising a child with special needs presents physical, emotional with ceiling lift and changing table: This option was the most straightforward in addressing our top priorities: installation of a ceiling lift to enable safe transfers in and out of the bathtub, a longer changing table to accommodate Julia's growth, maintaining a tub/shower combo so that the space could also be used by other family members and reconfiguration of the cabinets for more accessible storage.
While straightforward, the space does not lack for creative solutions. The changing table pulls out from under a countertop, doubling the length of the changing area and enabling it to disappear when it is not in use. The drawers under the changing area were designed specifically to provide perfect storage for all of Julia's personal care supplies. And, an oversized ceiling heater keeps the space toasty warm for her.
Raising a child with special needs presents physical, emotional and financial challenges. You want your home to be a safe haven in that storm of complexities. Adapting your living space to accommodate the accessibility and mobility needs of your child is a critical part of creating that haven for yourself, your child and your entire family.
Approaching home adaptations with a spirit of creativity and thoughtfulness can lay the foundation for creating accessibility that makes day-to-day life easier. Being fully invested in the process while still taking into account the expertise of professionals and others who have faced similar challenges provides the greatest likelihood of home adaptations that are a perfect fit for your family's unique situation.•
ABOUT THE AUTHOR: Michele Rosner is the mother of four children, including a daughter with multiple disabilities and complex medical challenges. With a desire to help others overcome adversity and find more joy in the journey of raising a child with disabilities, she launched Different Kind of Special (differentkindofspecial.com). This online community provides resources and support for families who have a child with special needs.
CREATING ACCESSIBLE HOME BATHROOMS FOR CHILDREN
BY BECKY WRIGHT
The conversion of a home bathroom to an accessible bathroom can be a huge challenge for a family, both logistically and financially. When making bathroom accommodations for a child with disabilities, it is important to consider the age and size of the child. Using a smaller toilet, sink and shower seat may be the best option.
I f there is an option, modifying a first-floor bathroom will allow for easy access on a daily basis. Creativity in the design process may be required especially if your home is older. An interior designer with experience in Universal Design is able to offer suggestions and recommendations for a highly functional bathroom that allows for accessibility for people with mobility challenges. If you seek assistance with Universal Design, contact your local bath showroom or an experienced home remodeler.
Most accessible toilets, sinks and showers are designed for an adult-sized person and they are installed at a height that works for adults. This can make it complicated for children to use the bathroom successfully. It is a much more pleasant personal care experience for children when toilets and sinks are the proper size and installed at the correct height for someone small.
Child-sized toilets have rims that are 10 to 12 inches from the floor making them much easier for young children (age 2 to 7) to use on their own. Toilets can be purchased from both on-line or bathroom showroom suppliers. Before selecting a small, child-sized toilet for your home, determine what rough in plumbing is in place, to do this, measure from the back wall to the center of the floor hole. Rough in can range from 10 to 16 inches but the typical rough in is about 12 inches from wall to hole center.
A standard height toilet will measure 14 to 15 inches from floor to bowl rim. In older homes, this is likely to be the toilet height if a remodel hasn't happened in recent years. The standard height toilet is appropriate for older children who are age 7 to 12 and for shorter teens and adults. Usually when purchasing any size new toilet the toilet seat is sold separately. The toilet seat selected can add varying heights to the toilet but will usually add about 1 inch. The comfort height toilets that are now available are taller than a standard height unit and will measure 17 to 19 inches from floor to rim. These work well for adults, very tall individuals or older people since they make sitting down and getting up easier. The comfort height toilet is designed to be the same sitting height as a regular chair.
Finally, there are elevated toilets used by those who have a hard time getting up and down. These are often raised toilet seats that are installed on standard or comfort height toilets and add 3 to 4 inches to the height of the seat. Elevated toilet seats are also available with arms to give an added sense of security. For a child that needs a parent to help them transfer from a wheelchair to the toilet, having the highest seat possible makes it easier for the parent, especially as the child gets older and is less likely to result in caregiver injury.
In addition to floor mount toilets there are also wall-hung toilets that have the plumbing and flange on the wall rather than the floor. A wall-hung toilet can be easier to clean around since a mop is able to get everywhere under the unit. There can be weight restrictions on wall-hung toilets so be sure to confirm everyone who will be using the toilet is within the guidelines.
If adding a child-sized toilet to your bathroom, consider adding a child-sized sink as well. Pedestal and wall-mount sinks are available in smaller sizes to accommodate young children. A standard pedestal sink is usually 33 to 35 inches high. The smaller child-sized version is 20 to 22 inches high. The down-side to having a pedestal sink is the loss of storage in the bathroom but the advantage is there is more floor space and easier access. To prevent burns and injuries, insulate the hot-water and drain pipes under a wall mount or pedestal sink. A child using a wheelchair may need to have the standard height sink with the open access under the sink found in a wallmount or pedestal unit to accommodate the wheelchair rolling close enough. There are wall-mount sinks available that offer curved fronts that will allow a child (or adult) using a wheelchair to get closer to the faucet. There are also sinks available with hand pulls in the front (a grab bar that is part of the sink) that allow an individual using a wheelchair to maneuver easily.
Many practical changes that are used for seniors, who are Aging-In-Place, can also be used when modifying a home for a child with a disability. Lever handles on doors and levered faucets are easier to use and require less strength to operate. Tile and hardwood floors are easier to navigate than carpet and area rugs. Installing handrails on both sides of steps assists with going up and down. Adding motion sensor lighting, especially in walkways and stairs within the home will make a safer environment for everyone living there.
When a child is very small it is not too difficult to bathe them, however, as they get older it is important to have a bathroom layout that will allow for easy access to the shower or tub. A roll-in shower for children in a wheelchair or a walk-in shower without barriers will make self-care easier as a child ages and grows. If a child is able to step over the side of a bathtub, then adding a wall mount bathtub seat provides an added level of security. Using a shower curtain rather than a shower door will make caregiver access easier when assistance is needed. Another bathroom safety product that can be adapted for children is the shower seat. The shower seat is usually mounted at the same height as the toilet seat, so for adults that would be most comfortable in the 15 to 19 inch range. For children the recommended height would be 10 to 15 inches, keeping in mind a child will feel safer and less likely to slip off a wet seat, if their feet can touch the shower floor while seated.
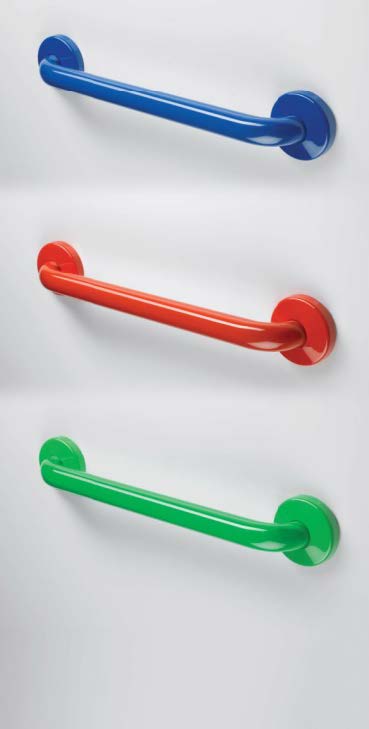
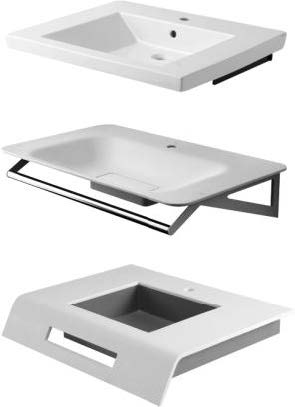
Showers and bathtubs should have grab bars installed to assist with both entering and exiting. Vertical grab bars in showers are best if standing and balance are issues. Using a vertical grab bar can be easier if strength in wrists, elbows and shoulders is an issue. There are rounded grab bars that can be installed around the faucet. Handheld shower holders on vertical grab bars can be adjusted and lowered so children can reach the shower head on their own. Additional horizontal shower grab bars are great for storing and easy access to shampoo, washcloth and other bathing supplies. Grab bars come in many finishes and AHEAD OF THE CURVE A child using a wheelchair may need to have open access under the sink to accommodate a wheelchair. Some sinks offer curved fronts that will allow a child (or adult) using a wheelchair to get closer to the faucet. There are also sinks with hand pulls in the front (a grab bar that is part of the sink) that allow an individual using a wheelchair to maneuver more easily. designs. Especially when being used in a private home, grab bars do not need to look institutional. There are many attractive options available, including colored vinyl and painted finish grab bars that work great and look fabulous in a home. Selecting a contrasting color makes it easier for anyone with any visual impairment to see the grab bar. Grab bars should measure 1¼ to 1½ inches in diameter so they are easy to grip. The smaller size 1¼ inch diameter grab bar will be easier for a child to hold on to. When mounted, there should be 1 ½ inches of clear space between the grab bar and the wall. Do not install a towel bar to do the work of a grab bar, towel bars are decorative and do not offer the same strength and durability of a grab bar.
Placement of grab bars around a toilet area should be at a comfortable height for the user. For example, a young child may find grab bars work best when at a lower height than an adult would use. Most frequently, grab bars are placed on one or both sides of the toilet, behind and above the tank, on a wall directly in front of the toilet and above the toilet paper holder and above the toilet paper holder. When there is a caregiver assisting with toileting, including additional grab bars where the caregiver might need to balance or brace themselves may be beneficial as well.
Kathy Wu of Janesville, Wisconsin has made bathroom accommodations to their home over the years to assist daughter Alexis Horne, now age 30, who has Cerebral Palsy. When Lexi was younger and began using a wheelchair they faced challenges because the chair would not fit into the bathroom with normal sized doors. The family remodeled and removed a closet, flipped and raised the sink and widened the door to 36 inches to allow Lexi access to the bathroom. Today parents who have a child with a disability have much greater access to information on the internet than Kathy had when Lexi was younger. Networking and connecting with other parents, physical therapists, and the resources at Special Olympics were very helpful for Kathy; she says "parents were really on their own for finding answers." When Lexi was small, Kathy was able to carry her, but by the time Lexi was 10 years old it became too much of a physical challenge for Kathy and they installed a roll-in shower with a rubber lip for Lexi's shower chair. Kathy states that she learned to look at everything in her home differently, "everything must be at a level your child can use, things like towel bars should be lower and for my daughter the sink needed to be higher."
Kathy states, "Installing a taller toilet and elevated toilet seat would have been easiest for me as the caregiver because Lexi requires assistance with all physical moves. But I hadn't thought of that and we managed with just a normal height toilet." Today, Lexi lives in an adult group home. When doing a home remodel it is not necessary to follow the guidelines of the Americans with Disabilities Act (ADA) which was signed into law in 1990. The law was enacted to insure the civil rights of individuals with disabilities and established guidelines for creating a barrier-free environment for everyone in public buildings and bathrooms. The basic ADA guidelines are based on adult dimensions, but there are alternate guidelines based on children's dimensions.
The ADA guidelines don't work for everyone, especially children and individuals who are shorter or taller than "average."
In summary, here are some tips for making the home bathroom more user friendly for children: 1. Install smaller, child-sized toilets, 10 to 12 inches in height from floor to rim, either floor mount or wall-hung models are available.
2. Transition toilet height as children age and grow to make accessibility easier for them. Standard toilets are 14 to 15 inches from floor to rim. Comfort height toilets are 17 to 19 inches and are easiest for adults to use. Finally the elevated toilet seat, which can be added to any toilet adding 3 to 4 inches.
3. Install grab bars at the height most comfortable for users.
4. Smaller sinks that measure 20 to 22 inches high are easier for children to use.
5. Install shower seats at child height of 10 to 15 inches so children feel safe.
6. Never install a towel bar to do the work of a grab bar.
7. All accommodations should be made to address the specific needs of the child.•
ABOUT THE AUTHOR: Becky Wright is the Division Manager for Showrooms at Ponte Giulio USA, a manufacturer of bathroom safety and accessibility products. She is the author of nine educational games and activities including Bullying & Harassment Situation Cards. She lives in Janesville, Wisconsin. She can be reached at becky.wright@PonteGiulio USA.com
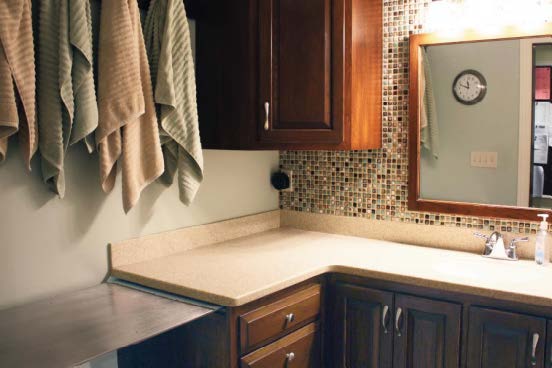
TIME FOR A CHANGE (Left) Prior to the redesign, this flip-down changing table was too small to accommodate Julia's growth, and much of the cabinet storage was not accessible when the changing table was in use. (Right) We needed to have a changing table that was at the right height for caregivers as well as the right length to accommodate our growing girl. The new changing table was a collaborative effort between Matt and the cabinet maker. The simple, yet ingenious design allows maximum use of a small space.
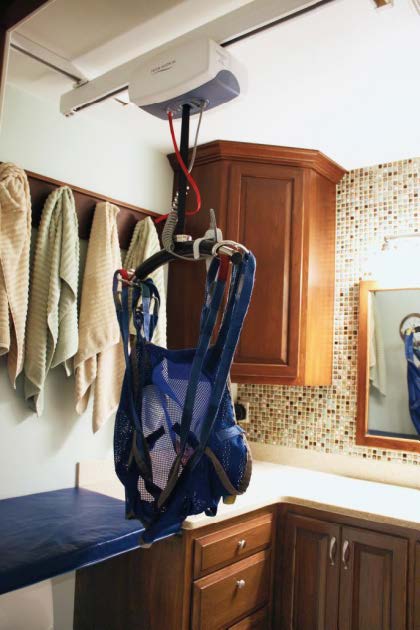
LIFT ME UP (Left) When not in use, the changing table slides under the countertop, making the space usable for other family members and guests. A mat placed on the slide-out table makes it level with the countertop, doubling the length of usable space. (Right) A ceiling lift and sling enable safe transfers in and out of the bathtub. Our lesson learned here was to make sure that we evaluated every option thoroughly ourselves. Having clearly defined priorities ensured that we did not end up with an adaptation that did not meet our specific needs.
SMALL ADAPTATION, PERFECT TIMING, HUGE IMPACT Changing the angle of this hallway corner from 90 degrees to 45 degrees has been a game changer, providing the clearance needed to move large equipment to and from Julia's bedroom. As we were doing the bathroom remodel, I was talking about a mobility challenge with my cousin, who is a general contractor. Julia's room is at the end of a hallway that had a right turn, and it was difficult to move equipment, such as a stander or wheelchair, to and from Julia's room. My cousin suggested turning the 90-degree angle of the wall into a 45-degree angle instead. Because we were in the midst of the bathroom remodel, with the drywaller and plumber already onsite, this was a simple and cost-effective project. Now, getting Julia and her equipment up and down the hallway is much easier.
GETTING HELP FROM ACCESSIBILITY EXPERTS With more and more senior citizens desiring to 'age in place' and stay in their homes longer, more attention is being given to home accessibility. Take advantage of this trend and tap into ideas from accessibility consultants. These experts can be found by talking to your child's case manager or doing an internet search of your state and 'accessibility consultant' or a similar search term. As with any consultant, be sure to carefully vet their background. Also, be sure they listen to your needs and understand your situation so their suggestions help you address your unique circumstances.
FINDING ANSWERS: Today, parents who have a child with a disability have much greater access to information on the internet than Kathy had when Lexi was younger.